How to Use the Filters
1. Click Employees on the left-hand menu.

2. Select from the predefined Filters pinned at the top.

- Completed: employees that have completed all of their Active programs
- Not Signed Up: employees that have not yet signed up for the Nevvon app
3. Alternatively, click the Filters button to see more options. Here you can filter employees based on the criteria that you choose.
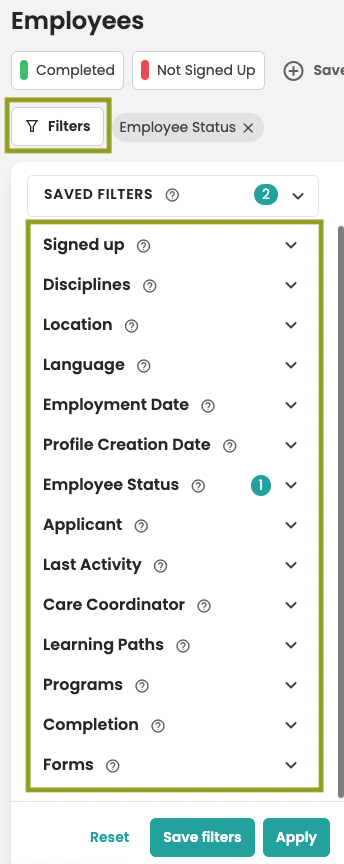
You can expand any of the choices to reveal more filtering options by clicking on the arrow.
For example, click on the arrow next to Disciplines to view a list of disciplines to filter by.
You can select one or more parameter on one or more filter option. The filters are designed to give you the flexibility and control you need.
When you have selected the filter options you need, click APPLY.
Note: Applying the filters will not save that view for future use. To save filter, click the Save Filters button at the bottom and name your custom filter. Then it will always appear for you at the top, next to the other preset filters.
What can you filter by?
- Signed up: employees who have signed up for the Nevvon app
- Disciplines: employees that are tagged under this discipline
- Location: employees that are tagged under this location
- Language: employees that have a certain preferred language selected
- Employment Date: employees who started working with the agency on the selected date
- Profile Creation Date: employees who had their Nevvon profile created on the selected date
- Employee Status: employees that are identified as Active, On hold or Terminated in Nevvon
- Applicant: employees that are considered an applicant
- Care Coordinator: employees that are assigned to the selected Care Coordinator
- Learning Paths: employees that are assigned to the selected learning path(s)
- Programs: employees that are assigned to the selected program(s)
- Completion: employees that have reached the chosen completion rate. Note that the completion rate is calculated based on the hours of all the programs the employee is assigned to.
- Forms: employees that are assigned to the selected Form(s)
4. Once you have filtered your list to include the employees you want, you can perform different actions to your list. To select individual employees, click the check box next to their name:

Or to select the entire list of employees, click the check box at the very top and then click to select all at the very bottom.

5. With your desired employees selected, click Actions at the top right to reveal the list of possible actions.

- *Set status to - can update the employee status between Active, On hold and Terminated. If your panel is integrated with your AMS, make these changes directly in your AMS, not in Nevvon.
- Add to program - will open a modal to add a program to your list
- Add to learning path - will open a modal to add a learning path to your list
- Add to Form - will open a modal to add a form to your list
- Remove from form - will open a modal to remove a form from your list
- Download Forms - will open a modal to download a form for your list
- Message - will open a modal to send an in-app message to your list
- Customize columns - will allow you to customize the columns in your view
- 6. If desired, you can also export your list by clicking
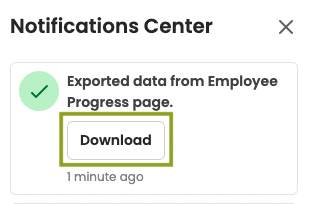
- .

- 7. Your exported list will be available to download from the Notifications Center

- 8. Click Download to download your report to your computer.